
How to Easily Backup Emails from cPanel – Complete Guide
Backing up emails from cPanel is a straightforward process. You can back up your emails manually via the cPanel interface or use email client software to download your emails to your local machine. Here’s a step-by-step guide on how to do this:
Method 1: Backup Emails via cPanel
- Log in to cPanel:
- Access your cPanel account by navigating to
http://yourdomain.com/cpaneland logging in with your credentials.
2. Go to the Email Accounts Section:
- Scroll down to the Email section and click on Email Accounts.
3. Access Webmail for the Email Account:
- Locate the email account you want to back up and click on the Check Email button to access webmail for that account.
4. Export Emails via Webmail:
- Once in webmail (Horde, Roundcube, or SquirrelMail), you can select all emails and use the export functionality if available. For example, in Roundcube:
- Select the emails you want to back up.
- Click on the More button and choose Export. This will download the selected emails as an MBOX file.
Method 2: Backup Emails Using an Email Client
- Set Up an Email Client:
- Use an email client like Microsoft Outlook, Mozilla Thunderbird, or Apple Mail.
2. Configure Your Email Account:
- Set up your email account in the client using IMAP (recommended for backup purposes). IMAP syncs emails between the server and your client, allowing you to download and store emails locally.
- IMAP Settings:
- Incoming Mail Server: mail.yourdomain.com
- Outgoing Mail Server (SMTP): mail.yourdomain.com
- Username: Your full email address (e.g., [email protected])
- Password: Your email account password
- IMAP Port: 143 (or 993 for SSL)
- SMTP Port: 587 (or 465 for SSL)
3. Download Emails:
- Once configured, the email client will download your emails. Ensure that you let the client fully synchronize all emails to your local machine.
4. Export Emails from the Email Client:
- Most email clients allow you to export emails. For example, in Thunderbird:
- Right-click on the email folder you want to back up.
- Select ImportExportTools > Export all messages in the folder > as MBOX file.
- Save the MBOX file to your preferred backup location.
Method 3: Manual Backup via cPanel File Manager
- Log in to cPanel:
- Access your cPanel account by navigating to
http://yourdomain.com/cpaneland logging in with your credentials.
2. Navigate to File Manager:
- Go to the Files section and click on File Manager.
3. Locate Email Files:
- Navigate to the
maildirectory. This is usually located at/home/your_cpanel_username/mail.
4. Download Email Files:
- Within the
maildirectory, you will find folders corresponding to your email accounts. Compress the desired email account folder (right-click and select Compress) and download the compressed file to your local machine.
Tips for Effective Backup
- Regular Backups: Set a regular schedule for backing up your emails to avoid data loss.
- Multiple Copies: Keep multiple copies of your backups in different locations (e.g., local storage, external drives, cloud storage).
- Verify Backups: Periodically check your backup files to ensure they are complete and can be restored if needed.
By following these methods, you can ensure your emails are safely backed up from your cPanel hosting.
Fix PHP Mail() Not Working in cPanel Hosting – Easy Guide
If the PHP mail() function is not working on your cPanel hosting, there are several potential issues to consider and steps you can take to troubleshoot and resolve the problem. Here’s a comprehensive guide to help you diagnose and fix the issue:
Steps to Troubleshoot and Fix PHP mail() Function Issues
1. Check Basic PHP Configuration:
- Ensure
mail()Function is Enabled: - Check if the
mail()function is enabled in your PHP configuration. You can create a PHP info file to see the PHP configuration:php
<?php phpinfo(); ?> - Look for the
disable_functionsdirective. Ifmailis listed there, it means the function is disabled.
2. Verify Email Configuration in cPanel:
- Check Email Routing:
- In cPanel, go to the Email section and click on Email Routing. Ensure that it is set correctly for your domain (e.g., Local Mail Exchanger if you are using the hosting server to send emails).
3. Test the mail() Function:
- Create a simple PHP script to test the
mail()function:
  <?php
  $to = '[email protected]';
  $subject = 'Test Email';
  $message = 'This is a test email to check the PHP mail function.';
  $headers = 'From: [email protected]' . "\r\n" .
             'Reply-To: [email protected]' . "\r\n" .
             'X-Mailer: PHP/' . phpversion();

  if(mail($to, $subject, $message, $headers)) {
      echo 'Email sent successfully';
  } else {
      echo 'Email sending failed';
  }
?>- Upload this script to your web server and run it by accessing it through a web browser. This will help you determine if the
mail()function works.
4. Check Email Logs:
- Review the email logs for any errors or issues related to sending emails. The logs are typically located at
/var/log/exim_mainlogif you have access to SSH:
tail -f /var/log/exim_mainlog- If you don’t have SSH access, you might need to contact your hosting provider for log access.
5. Ensure Correct DNS Settings:
- Verify that your domain’s DNS settings are correct, especially the MX (Mail Exchange) records, to ensure proper email delivery.
6. SPF and DKIM Records:
- Ensure that your domain has proper SPF (Sender Policy Framework) and DKIM (DomainKeys Identified Mail) records set up. These records help authenticate your emails and improve delivery success.
7. PHP Mail Configuration in php.ini:
- Check the
php.iniconfiguration for thesendmail_pathdirective. It should be correctly set to the path of the sendmail binary or equivalent mail transfer agent (MTA).
sendmail_path = /usr/sbin/sendmail -t -i8. Use an SMTP Server:
- If the
mail()function continues to fail, consider using an SMTP server for sending emails. This is often more reliable and can provide better logging and error handling. You can use PHPMailer or another library to send emails via SMTP. Example using PHPMailer:
  use PHPMailer\PHPMailer\PHPMailer;
  use PHPMailer\PHPMailer\Exception;

  require 'path/to/PHPMailer/src/Exception.php';
  require 'path/to/PHPMailer/src/PHPMailer.php';
  require 'path/to/PHPMailer/src/SMTP.php';

  $mail = new PHPMailer(true);

  try {
      //Server settings
      $mail->SMTPDebug = 2;                                       // Enable verbose debug output
      $mail->isSMTP();                                            // Set mailer to use SMTP
      $mail->Host       = 'smtp.example.com';                     // Specify main and backup SMTP servers
      $mail->SMTPAuth   = true;                                   // Enable SMTP authentication
      $mail->Username   = '[email protected]';                     // SMTP username
      $mail->Password   = 'secret';                               // SMTP password
      $mail->SMTPSecure = 'tls';                                  // Enable TLS encryption, `ssl` also accepted
      $mail->Port       = 587;                                    // TCP port to connect to

      //Recipients
      $mail->setFrom('[email protected]', 'Mailer');
      $mail->addAddress('[email protected]', 'Joe User');    // Add a recipient

      // Content
      $mail->isHTML(true);                                        // Set email format to HTML
      $mail->Subject = 'Here is the subject';
      $mail->Body    = 'This is the HTML message body <b>in bold!</b>';
      $mail->AltBody = 'This is the body in plain text for non-HTML mail clients';

      $mail->send();
      echo 'Message has been sent';
  } catch (Exception $e) {
      echo "Message could not be sent. Mailer Error: {$mail->ErrorInfo}";
  }
Conclusion
By following these steps, you should be able to identify and resolve the issue with the PHP mail() function not working on your cPanel hosting. If the issue persists, it may be beneficial to contact your hosting provider for further assistance, as they can provide more specific insights and support based on your hosting environment.
Run a PHP File in a Cron Job Using cPanel – Easy Guide
To run a PHP file in a cron job using cPanel, follow these steps:
Step-by-Step Guide
- Log in to cPanel:
- Access your cPanel by entering your domain name followed by
/cpanel(e.g.,http://yourdomain.com/cpanel) and log in with your credentials.
2. Navigate to the Cron Jobs Section:
- Once logged in, scroll down to the “Advanced” section and click on “Cron Jobs.”
3. Add a New Cron Job:
- In the Cron Jobs interface, you can add a new cron job. This involves setting the schedule and the command to run.
4. Set the Cron Job Schedule:
- Define how often you want the cron job to run using the provided fields for minute, hour, day, month, and weekday. You can use predefined intervals or customize the timing.
- Common Settings:
- Every minute:
* * * * * - Every hour:
0 * * * * - Daily:
0 0 * * *
5. Specify the Command to Run the PHP File:
- Enter the command to run your PHP file. Typically, this involves using the PHP binary followed by the path to your PHP script. Here are some examples:
sh
/usr/local/bin/php /home/username/public_html/your_script.php
Replace:/usr/local/bin/phpwith the correct path to your PHP binary. You can find this path in your cPanel or by asking your hosting provider./home/username/public_html/your_script.phpwith the full path to your PHP file.usernameis your cPanel username, andyour_script.phpis the name of your PHP file.
6. Save the Cron Job:
- Click on the “Add New Cron Job” button to save your cron job. It will now appear in the list of cron jobs.
Example Command
If your PHP binary is located at /usr/bin/php and your PHP script is located in the public_html directory of your cPanel account, the command would look like this:
/usr/bin/php /home/your_cpanel_username/public_html/your_script.phpVerifying the Cron Job
- Check the Cron Job List:
- Ensure your cron job is listed under “Current Cron Jobs” in the cPanel interface.
2. Check Output:
- By default, any output from the cron job will be emailed to your cPanel account’s email address. You can check your email for success or error messages.
- Alternatively, you can redirect the output to a file for logging:
sh
/usr/bin/php /home/your_cpanel_username/public_html/your_script.php > /home/your_cpanel_username/cron_log.txt 2>&1
Troubleshooting
- Check File Permissions: Ensure your PHP file has the appropriate permissions to be executed.
- Correct PHP Path: Verify that the path to the PHP binary is correct. You can find the correct path by running
which phpin the terminal, if you have SSH access. - Error Logging: Redirect errors to a log file to diagnose issues:
/usr/bin/php /home/your_cpanel_username/public_html/your_script.php > /home/your_cpanel_username/cron_log.txt 2>&1By following these steps, you can successfully set up a cron job in cPanel to run a PHP file at specified intervals.
Where PHP Stores Error Logs: PHP 5, Apache, FastCGI, cPanel
In a typical setup with PHP 5 running on Apache using FastCGI and managed through cPanel, the PHP error log can be stored in various locations depending on the configuration. Here’s how to determine where PHP stores its error logs and how to configure it:
Default Error Log Locations
- PHP Configuration File (
php.ini):
- The location of the PHP error log is specified in the
php.iniconfiguration file. The directive to look for iserror_log.
To find yourphp.inifile:
php --iniWithin php.ini, the error_log directive specifies the path to the error log file:
error_log = /path/to/php-error.log2. Apache Configuration:
- If
error_logis not specified inphp.ini, PHP errors might be logged to the Apache error log. The Apache error log file is typically defined in the Apache configuration file (httpd.confor a file in theconf.ddirectory). Common locations for Apache error logs:
   ErrorLog "/var/log/apache2/error_log"  # Debian/Ubuntu
   ErrorLog "/var/log/httpd/error_log"    # Red Hat/CentOS
3. cPanel Configuration:
- When using cPanel, error logs can also be found in user-specific directories. Each cPanel user has an error log file located at:
/home/username/logs/domain.com-php.error.logChecking and Configuring the Error Log
- Locate and Edit
php.ini:
- Access your server via SSH or cPanel’s File Manager.
- Open the
php.inifile. The location of this file may vary, but common locations include:/etc/php5/apache2/php.ini /usr/local/lib/php.ini - Set the
error_logdirective:ini error_log = /home/username/public_html/php-errors.log
2. Configure Error Logging:
- Ensure error logging is enabled in
php.ini:ini log_errors = On
3. Restart Apache:
- After making changes to
php.inior Apache configuration files, restart Apache to apply the changes:bash
sudo systemctl restart apache2 # Debian/Ubuntu
sudo systemctl restart httpd # Red Hat/CentOS
Viewing the Error Log
- You can view the error log using command-line tools such as
tailor through the cPanel File Manager. Command to view the last few lines of the error log:
tail -f /home/username/public_html/php-errors.logSummary
- Default Location: If
error_logis not set inphp.ini, errors might go to the Apache error log. - Configured Location: Set the
error_logdirective inphp.inito a specific path to ensure PHP errors are logged to your desired location. - cPanel Users: Check
/home/username/logs/domain.com-php.error.logfor user-specific error logs.
By following these steps, you can ensure that you correctly locate and configure the PHP error log in an environment using PHP 5, Apache, FastCGI, and cPanel.
Fixing Size Change Issues in Child Controls – Easy Solutions
When encountering problems passing on size changes to child controls, you typically need to ensure that the parent control properly notifies its children of any size adjustments. Here are some common steps and solutions to address this issue in different environments:
General Steps:
- Ensure Layout Management:
- Verify that the layout manager (if available) is correctly handling size changes. For instance, in environments like Java Swing, the layout manager will automatically adjust child components when the parent resizes.
2. Override Resize Methods:
- In many UI frameworks, you might need to override the resize or layout method of the parent control to manually adjust the size and position of child controls.
Specific Environments:
1. WinForms (C#):
- Ensure Docking and Anchoring:
  // Set Dock or Anchor properties
  childControl.Dock = DockStyle.Fill;
  // or
childControl.Anchor = AnchorStyles.Top | AnchorStyles.Bottom | AnchorStyles.Left | AnchorStyles.Right;- Override OnResize:
  protected override void OnResize(EventArgs e)
  {
      base.OnResize(e);
      foreach (Control child in this.Controls)
      {
          // Adjust child size/position here if necessary
          child.Size = new Size(this.ClientSize.Width / 2, this.ClientSize.Height / 2);
      }
  }
2. WPF (C#):
- Ensure Proper Layout Panels:
- Use layout panels like
Grid,StackPanel, orDockPanelwhich automatically handle child resizing. - Bind Size:
  <Grid>
      <Button Width="{Binding ActualWidth, RelativeSource={RelativeSource AncestorType=Grid}}" />
  </Grid>
3. Java Swing:
- Use Layout Managers:
- Ensure you are using appropriate layout managers like
BorderLayout,GridLayout, orBoxLayout. - Override Component Resized:
  public class MyPanel extends JPanel {
      public MyPanel() {
          addComponentListener(new ComponentAdapter() {
              @Override
              public void componentResized(ComponentEvent e) {
                  // Adjust child components here
                  for (Component child : getComponents()) {
                      child.setSize(getWidth() / 2, getHeight / 2);
                  }
              }
          });
      }
  }
4. Web Development (HTML/CSS/JavaScript):
- Use Flexbox or Grid:
  .parent {
      display: flex;
  }
  .child {
      flex: 1;
}- JavaScript for Dynamic Resizing:
  window.addEventListener('resize', function() {
      let parent = document.querySelector('.parent');
      let children = parent.children;
      for (let child of children) {
          child.style.width = (parent.clientWidth / 2) + 'px';
      }
  });
Debugging Steps:
- Check Parent and Child Control Properties:
- Ensure that the child controls have properties set to allow resizing, such as
AutoSize,Dock,Anchorin WinForms, or responsive settings in web development.
2. Event Subscription:
- Make sure that the resize event is properly subscribed to and fired. For instance, in WinForms, ensure
OnResizeis called.
3. Manual Size Update:
- If automatic resizing doesn’t work, manually update child sizes in the resize event handler.
By following these guidelines and using appropriate techniques for your development environment, you should be able to resolve issues with passing size changes to child controls.
Add Email Signature When Forwarding in cPanel – Easy Steps
To add an email signature when forwarding an email in cPanel’s Webmail using HTML code, follow these steps for Roundcube, Horde, and SquirrelMail:
For Roundcube:
1. Log in to Roundcube:
– Access your cPanel.
– Go to Email Accounts and click Check Email next to the email account you want to use.
– Select Roundcube as your webmail application.
2. Navigate to Settings:
– Click on Settings in the top right corner.
3. Create a Signature:
– In the settings menu, click on Identities.
– Select the email address you want to create a signature for.
– In the Signature field, enter your HTML code for the signature. Ensure the HTML Signature checkbox is selected if you’re using HTML.
Example HTML Code:
html
<div>
<p>Best regards,</p>
<p><strong>Your Name</strong></p>
<p>Job Title</p>
<p>Company Name</p>
<p>Phone: (123) 456-7890</p>
<p>Email: <a href=”mailto:[email protected]”>[email protected]</a></p>
<p><a href=”http://www.yourwebsite.com”>www.yourwebsite.com</a></p>
</div>
4. Save Changes:
– Click Save to apply the changes.
For Horde:
1. Log in to Horde:
– Access your cPanel.
– Go to Email Accounts and click Check Email next to the email account you want to use.
– Select Horde as your webmail application.
2. Navigate to Preferences:
– Click on the Gear icon in the top menu.
– Select Preferences and then Mail.
3. Create a Signature:
– Click on Personal Information.
– Scroll down to the Signature field and enter your HTML code for the signature.
Example HTML Code:
html
<div>
<p>Best regards,</p>
<p><strong>Your Name</strong></p>
<p>Job Title</p>
<p>Company Name</p>
<p>Phone: (123) 456-7890</p>
<p>Email: <a href=”mailto:[email protected]”>[email protected]</a></p>
<p><a href=”http://www.yourwebsite.com”>www.yourwebsite.com</a></p>
</div>
4. Save Changes:
– Click Save to apply the changes.
For SquirrelMail:
1. Log in to SquirrelMail:
– Access your cPanel.
– Go to Email Accounts and click Check Email next to the email account you want to use.
– Select SquirrelMail as your webmail application.
2. Navigate to Options:
– Click on Options in the top menu.
3. Create a Signature:
– Click on Personal Information.
– Scroll down to the Signature field and enter your HTML code for the signature.
Example HTML Code (Note: SquirrelMail might not fully support HTML signatures):
html
<div>
<p>Best regards,</p>
<p><strong>Your Name</strong></p>
<p>Job Title</p>
<p>Company Name</p>
<p>Phone: (123) 456-7890</p>
<p>Email: <a href=”mailto:[email protected]”>[email protected]</a></p>
<p><a href=”http://www.yourwebsite.com”>www.yourwebsite.com</a></p>
</div>
4. Save Changes:
– Click Submit to apply the changes.
Forwarding Emails with Signature
When you forward an email, your signature should automatically appear if you have set it up correctly:
1. Forward an Email:
– Open the email you want to forward.
– Click Forward.
2. Check Signature:
– Ensure your signature appears at the bottom of the email body. If it does not, you might need to manually insert it or check your settings again.
By following these steps, you can add an HTML email signature when forwarding emails in cPanel’s Webmail applications.
What are Incoming and Outgoing Mail Server Settings.
Incoming and Outgoing Mail Server Settings:
1. The Incoming Mail Server Settings:
Protocal : IMAP/POP3
Hostname: IP/Hostname
Port: 143/993 (IMAP) / 110/995 ( POP3)
Username : Email-Id.

2. Outgoing Mail Server Settings.
Hostname: IP/Hostname
Port : 25/587
Connection security: Autodetect/ SSL/STARTTLS
Username : Username {Email/Username}

Learn to Migrate Email to G Suite
1. Create an account in G Suite.
2. Go back to the G Suit dashboard and logged in as admin.
3. From the dashboard and select migration.
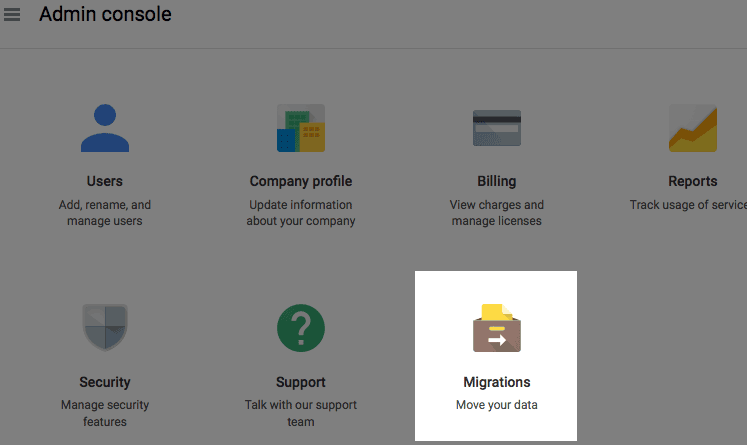
4. To start with the migration and select the type of server you are migarting from.
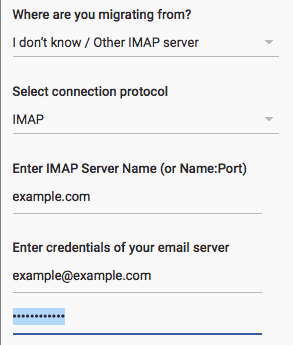
Note:- Next, select the content you want to migration,click select users to processd and select the user to migrate this email content to .
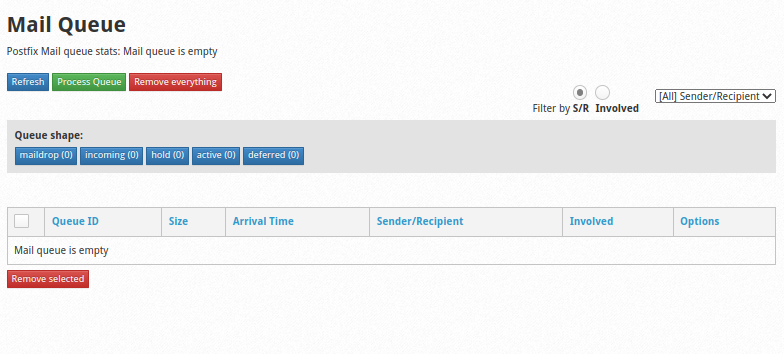
How to view Queued Emails in cwp?
1. Login into CWP panel.

2. Click on Email and select Manage Mail Queue.

3. In Manage Mail Queue you can find all the queued email.
How to use roundcube?
1. Login into roundcube by https://domainname/roundcube
2. Enter username and password and click on Login.

3. To send mail click on Compose and enter To, Subject and body and click send button.

4. Select Mail to check Inbox, Sent mails, Spam mails and Drafts.

5. Select Contacts to check all contact, This feature also allow to add new contact by entering required information and user can also import contact through CSV files. Through this feature user can manage large number of contact easily.

6. Select Task to add To-Do list, This feature mainly allow user to add task, due dates and add description for each task.
