Setting Timezone for MySQL Before Inserting PayPal Transactions to Ensure Correct Timestamps
To set the timezone for MySQL before inserting a PayPal transaction so that the timestamp is correct, you can follow these steps:
- Determine the Timezone: First, determine the timezone that you want to use for your MySQL server. You can find a list of supported timezones in the MySQL documentation.
- Set MySQL Timezone: You can set the timezone for MySQL server globally by editing the MySQL configuration file (
my.cnformy.ini) or by running a SQL query to set it temporarily. To set the timezone globally in the MySQL configuration file, add the following line under the[mysqld]section:
default-time-zone = 'timezone'Replace 'timezone' with the timezone you want to use, such as 'America/New_York' or 'UTC'.
Alternatively, you can set the timezone temporarily for the current session using the following SQL query:
SET time_zone = 'timezone';- Insert PayPal Transaction: After setting the timezone for MySQL, you can insert the PayPal transaction into your database. MySQL will use the specified timezone to interpret and store the timestamp associated with the transaction.
Here’s an example of how you can set the timezone for MySQL before inserting a PayPal transaction using PHP and MySQLi:
<?php
// Connect to MySQL server
$conn = new mysqli('localhost', 'username', 'password', 'database');

// Check connection
if ($conn->connect_error) {
    die("Connection failed: " . $conn->connect_error);
}

// Set timezone for MySQL
$conn->query("SET time_zone = 'America/New_York'"); // Replace with your desired timezone

// Insert PayPal transaction
$timestamp = date('Y-m-d H:i:s'); // Current timestamp
$query = "INSERT INTO transactions (amount, timestamp) VALUES ('$amount', '$timestamp')";
if ($conn->query($query) === TRUE) {
    echo "Transaction inserted successfully";
} else {
    echo "Error: " . $query . "<br>" . $conn->error;
}

// Close connection
$conn->close();
?>
Replace 'America/New_York' with the timezone you want to use. Ensure that the timezone you set matches the timezone used by your PayPal transactions to ensure correct timestamp interpretation and consistency.
Converting General Column Types to Numeric in LOAD DATA INFILE for MySQL
When using the LOAD DATA INFILE statement in MySQL to import data from a file into a table, you can convert general column types to numeric types by using user variables and the SET clause. Here’s how you can do it:
Suppose you have a file named data.txt with the following content:
1,John,25
2,Jane,30
3,David,28
And you want to load this data into a MySQL table named users, where the third column (age) should be converted from a general type to a numeric type.
Here’s the LOAD DATA INFILE statement with the conversion:
LOAD DATA INFILE '/path/to/data.txt'
INTO TABLE users
FIELDS TERMINATED BY ','
LINES TERMINATED BY '\n'
(id, name, @age)
SET age = CAST(@age AS UNSIGNED);
Explanation of the statement:
FIELDS TERMINATED BY ',': Specifies that fields in the file are separated by commas.LINES TERMINATED BY '\n': Specifies that lines in the file are terminated by newlines.(id, name, @age): Defines the columns in the table (id,name) and a user variable@ageto store the value of the third column from the file.SET age = CAST(@age AS UNSIGNED): Converts the value stored in@ageto an unsigned integer using theCASTfunction and assigns it to theagecolumn in the table.
Adjust the file path, table name, and column names according to your specific use case. You may also need to modify the data type conversion (e.g., using SIGNED instead of UNSIGNED) based on the actual data in your file.
Troubleshooting QueryException in PHP 8.1.27 and MySQL 10.48.3: “Could Not Find Driver”
The error “QueryException in PHP 8.1.27 and MySQL 10.48.3: Could not find driver” typically occurs when PHP cannot find the necessary MySQL driver to connect to the MySQL database. Here are some steps to troubleshoot and resolve this issue:
- Check PHP Version: Ensure that the PHP version you are using is compatible with the MySQL driver you intend to use. Make sure you have PHP 8.1.27 or later installed.
- Install MySQL Driver for PHP: Confirm that the MySQL driver for PHP is installed. In PHP, there are two commonly used MySQL extensions:
mysqliandpdo_mysql. Depending on your PHP setup, you may need to install one of these extensions. - Verify Installed PHP Extensions: Check which PHP extensions are installed and enabled. You can do this by creating a PHP script with the following contents and running it in your web server:
   <?php
   phpinfo();
   ?>
Look for sections named “mysqli” and “pdo_mysql” in the PHP info output. If you don’t see them, it means the corresponding MySQL driver is not installed or enabled.
- Install MySQL Driver Extension: Use the appropriate package manager for your system to install the missing MySQL driver extension. For example, if you’re using Ubuntu, you can install the
php-mysqlpackage formysqliextension orphp-mysqlpackage forpdo_mysqlextension.
sudo apt-get install php-mysqlor
sudo apt-get install php-mysqlnd- Enable MySQL Driver: After installing the MySQL driver extension, make sure it is enabled in your PHP configuration (
php.ini). Look for lines likeextension=mysqli.soorextension=pdo_mysql.soand ensure they are not commented out (no semicolon;at the beginning of the line). - Restart Web Server: Restart your web server to apply the changes to the PHP configuration.
sudo systemctl restart apache2 # For Apacheor
sudo systemctl restart php-fpm # For PHP-FPM- Test Connection: Create a simple PHP script to test the MySQL connection. For example:
   <?php
   $conn = new mysqli('localhost', 'username', 'password', 'database');
   if ($conn->connect_error) {
       die("Connection failed: " . $conn->connect_error);
   }
   echo "Connected successfully";
   $conn->close();
   ?>
Replace 'localhost', 'username', 'password', and 'database' with your actual MySQL server details.
- Check for Errors: If the connection still fails, check for any error messages in your web server’s error log (
error_log) or PHP error log (php_error.log). These logs can provide more information about why the MySQL driver is not being loaded.
By following these steps, you should be able to troubleshoot and resolve the “Could not find driver” error in PHP when connecting to a MySQL database.
How to Reindex a MySQL Table
To reindex a MySQL table, you can use the ALTER TABLE statement with the DROP INDEX and ADD INDEX clauses. Here’s how you can do it:
- Identify the Index to Reindex: Determine the name of the index you want to reindex. You can use the
SHOW INDEX FROM tablenamestatement to view the existing indexes on a table. - Drop the Existing Index: Use the
DROP INDEXclause to remove the existing index from the table. Make sure to specify the index name and the table name. - Recreate the Index: Use the
ADD INDEXclause to recreate the index on the table. Specify the index name, the columns to include in the index, and any additional options such as index type or storage engine.
Here’s an example of how you can reindex a MySQL table:
-- Drop the existing index
ALTER TABLE tablename DROP INDEX indexname;

-- Recreate the index
ALTER TABLE tablename ADD INDEX indexname (column1, column2);
Replace tablename with the name of your table and indexname with the name of the index you want to reindex. You can specify multiple columns in the index definition if necessary.
Keep in mind that dropping and recreating an index can temporarily affect database performance, especially for large tables. It’s a good practice to perform reindexing during off-peak hours or when the database load is low. Additionally, consider backing up your data before making any changes to the table structure.
Converting .fdb Database to MySQL Format
To convert a Firebird (.fdb) database to MySQL, you’ll need to follow these general steps:
1. Export Data from Firebird Database:
- Use a tool like FlameRobin or IBExpert to export the data from the Firebird database into a format that MySQL can import. Common formats include CSV or SQL dump files.
2. Convert Schema:
- Analyze the schema of the Firebird database and recreate it in MySQL syntax. Pay attention to data types, constraints, indexes, and other database objects.
- You can use tools like MySQL Workbench or Navicat to visually design the database schema and generate SQL scripts.
3. Import Data into MySQL:
- Once you have exported the data from Firebird and recreated the schema in MySQL, you can import the data into MySQL using the appropriate tools.
- If you exported the data to CSV files, you can use the MySQL
LOAD DATA INFILEstatement to load the data into MySQL tables. - If you exported the data to SQL dump files, you can simply execute the SQL script in MySQL to insert the data into the corresponding tables.
4. Verify Data Integrity:
- After importing the data into MySQL, verify the data integrity by comparing the data in MySQL tables with the original data in the Firebird database.
- Check for any discrepancies or errors during the conversion process and address them accordingly.
5. Test Queries and Functionality:
- Test your queries and application functionality against the MySQL database to ensure that everything works as expected.
- Pay attention to any differences in SQL syntax or behavior between Firebird and MySQL that may affect your application.
6. Optimize Performance (Optional):
- Once you have migrated the data to MySQL, consider optimizing the database schema, indexes, and queries for better performance.
- Use MySQL’s tools and techniques for performance tuning, such as optimizing indexes, configuring caching, and analyzing query execution plans.
7. Backup Firebird Database (Optional):
- After successfully migrating your data to MySQL and verifying its integrity, consider backing up the original Firebird database for archival purposes.
It’s important to note that the migration process may vary depending on the complexity of your database schema and the volume of data. Make sure to thoroughly test the migration process in a development or staging environment before performing it on your production database. Additionally, consider consulting with a database administrator or expert if you encounter any challenges during the migration process.
Designing Large Tables in MySQL: Best Practices
Designing large tables in MySQL requires careful consideration to ensure optimal performance, scalability, and maintainability. Here are some best practices to follow:
- Choose the Right Data Types: Select appropriate data types for your columns based on the nature of the data. Use the smallest data type that can accommodate your data to minimize storage requirements. For example, use INT instead of BIGINT if the range of values fits within INT.
- Normalize Where Possible: Normalize your database schema to reduce redundancy and improve data integrity. Break down tables into smaller, related entities to avoid storing duplicate data. However, be mindful of the performance implications of excessive normalization, especially for complex queries that require joining multiple tables.
- Denormalize for Performance: In some cases, denormalizing your schema can improve query performance by reducing the need for joins. Consider denormalizing data in read-heavy scenarios where query performance is critical. However, be cautious of the trade-offs and potential impact on data consistency.
- Partition Large Tables: Partitioning large tables into smaller, manageable chunks can improve query performance and maintenance tasks such as backups and index maintenance. Consider partitioning based on ranges of values, such as dates or numeric ranges, to distribute data across multiple physical storage devices.
- Optimize Indexing: Identify frequently queried columns and create appropriate indexes to speed up query execution. However, avoid over-indexing, as it can increase storage overhead and slow down write operations. Regularly review and optimize indexes based on query patterns and performance metrics.
- Use Compressed Storage: MySQL supports table-level compression, which can significantly reduce storage requirements for large tables. Enable compression for tables with repetitive or highly compressible data, such as text or JSON columns, to save disk space and improve I/O performance.
- Monitor and Tune Performance: Continuously monitor the performance of your large tables using MySQL’s built-in monitoring tools or third-party monitoring solutions. Analyze query execution plans, monitor resource utilization, and identify bottlenecks to fine-tune your database configuration and optimize query performance.
- Scale Horizontally: Consider horizontal scaling strategies such as sharding or replication to distribute data across multiple database instances and improve scalability. Implementing a distributed database architecture can help accommodate growing data volumes and handle increased load.
- Plan for Data Growth: Anticipate future data growth and plan your database schema and infrastructure accordingly. Implement strategies for data archival, purging, or partition pruning to manage data growth effectively without compromising performance.
- Regular Maintenance and Optimization: Perform regular maintenance tasks such as index reorganization, statistics updates, and database vacuuming to keep your database healthy and optimize performance. Schedule maintenance tasks during off-peak hours to minimize disruption to production operations.
By following these best practices, you can design large tables in MySQL that are efficient, scalable, and well-suited to handle the demands of your application.
Calculate Distance Using Latitude and Longitude in MySQL
To calculate the distance between two points specified by their latitude and longitude coordinates in MySQL, you can use the Haversine formula. The Haversine formula calculates the shortest distance between two points on the surface of a sphere given their latitudes and longitudes.
Here’s how you can create a MySQL function to calculate the distance using the Haversine formula:
DELIMITER $$

CREATE FUNCTION distance(lat1 FLOAT, lon1 FLOAT, lat2 FLOAT, lon2 FLOAT) RETURNS FLOAT
BEGIN
    DECLARE R FLOAT DEFAULT 6371; -- Earth's radius in kilometers
    DECLARE dLat FLOAT;
    DECLARE dLon FLOAT;
    DECLARE a FLOAT;
    DECLARE c FLOAT;
    DECLARE d FLOAT;

    SET dLat = RADIANS(lat2 - lat1);
    SET dLon = RADIANS(lon2 - lon1);

    SET a = SIN(dLat / 2) * SIN(dLat / 2) + COS(RADIANS(lat1)) * COS(RADIANS(lat2)) * SIN(dLon / 2) * SIN(dLon / 2);
    SET c = 2 * ATAN2(SQRT(a), SQRT(1 - a));
    SET d = R * c;

    RETURN d;
END$$

DELIMITER ;
This function takes four parameters: the latitude and longitude of the first point (lat1, lon1), and the latitude and longitude of the second point (lat2, lon2). It calculates the distance between these two points using the Haversine formula and returns the distance in kilometers.
You can then use this function in your SQL queries to calculate the distance between points. For example:
SELECT distance(40.7128, -74.0060, 34.0522, -118.2437) AS distance_between_points;This query will calculate the distance between New York City (latitude 40.7128, longitude -74.0060) and Los Angeles (latitude 34.0522, longitude -118.2437) in kilometers.
Troubleshooting Column Aliasing Issue in Joining from a Database View
When troubleshooting column aliasing issues in SQL queries involving joining from a database view, you can follow these steps to identify and resolve the problem:
- Review View Definition: Verify that the view definition includes proper aliasing for the columns you intend to use. Ensure that each column selected in the view has an alias defined using the
ASkeyword. - Check Column Names: Confirm that the column aliases used in your query match the aliases defined in the view. Even slight differences in naming can cause issues.
- Scope of Aliases: Remember that column aliases defined within the view are scoped within that view’s context. If you’re referencing columns from multiple tables/views in your query, make sure to alias them appropriately to avoid ambiguity.
- Syntax Verification: Double-check the syntax of your SQL query, paying close attention to the placement of aliases and any necessary punctuation such as commas and quotation marks.
- Use Aliases in Outer Query: If necessary, re-alias columns in the outer query to make them accessible or to apply additional transformations. This can help clarify which columns you’re referencing.
- Test Incrementally: Break down your query into smaller parts and test each part individually. This can help isolate where the issue is occurring.
- Check Data Types: Ensure that the data types of the aliased columns match the types expected by the query. Mismatched data types can lead to unexpected results or errors.
- Use Table Qualifiers: When referencing columns from multiple tables/views, use table qualifiers to specify which table/view each column belongs to. This can help avoid confusion and ensure the correct columns are selected.
By systematically reviewing these aspects of your SQL query and view definition, you should be able to identify and resolve any column aliasing issues encountered when joining from a database view. If the problem persists, providing specific details or code snippets can aid in further troubleshooting.
Python Script: Generate SQL Dump with Structure and Data
Below is a Python script that generates a SQL dump containing both the structure (schema) and data of a specified database table:
import sqlite3

def generate_sql_dump(database_name, table_name):
    # Connect to the database
    conn = sqlite3.connect(database_name)
    cursor = conn.cursor()

    # Retrieve table structure
    cursor.execute(f"PRAGMA table_info({table_name})")
    columns_info = cursor.fetchall()

    # Retrieve table data
    cursor.execute(f"SELECT * FROM {table_name}")
    table_data = cursor.fetchall()

    # Generate SQL dump for table structure
    sql_dump = f"CREATE TABLE {table_name} (\n"
    for column_info in columns_info:
        column_name = column_info[1]
        data_type = column_info[2]
        sql_dump += f"    {column_name} {data_type},\n"
    sql_dump = sql_dump.rstrip(',\n') + "\n);\n\n"

    # Generate SQL dump for table data
    sql_dump += f"INSERT INTO {table_name} VALUES\n"
    for row in table_data:
        values = ', '.join([f"'{value}'" if isinstance(value, str) else str(value) for value in row])
        sql_dump += f"    ({values}),\n"
    sql_dump = sql_dump.rstrip(',\n') + ";\n"

    # Close the connection
    conn.close()

    return sql_dump

# Example usage:
database_name = "example.db"
table_name = "users"
sql_dump = generate_sql_dump(database_name, table_name)

# Write SQL dump to a file
with open("database_dump.sql", "w") as f:
    f.write(sql_dump)

print("SQL dump generated successfully!")
This script assumes you’re working with a SQLite database. You can adjust it accordingly if you’re using a different database system like MySQL or PostgreSQL. Also, ensure you have appropriate permissions to access the specified database and table.
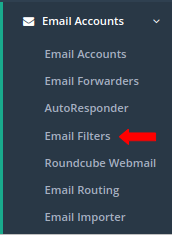
How to Add/Edit an Email Template in cwp/virtualmin?
Login into CWP user panel.

Click on Email Account and select Email Filters.
In Email Filter click on Manage filter to edit the template.
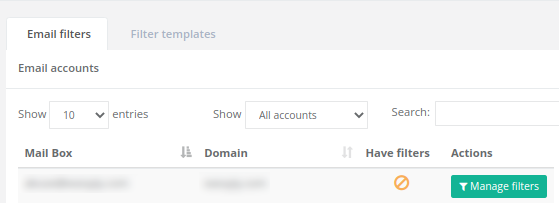
Clict on Filter templates and click on Add new filter template to add a new template.